 |
| Home |
| About the Site |
| Links |
| Webrings |
| Update Archive |
| Questionnaire |
| Questionnaire Results |
| Special Offers |
| Workshop Manual |
| Estima Details |
| Models & Specs |
| Translations |
| Model Release Information |
| How Much New? |
| Safety Test |
| How Much at Auction? |
| OBD Codes |
| Toyota Paint Colour Codes |
| Buying an Estima |
| How to Import an Estima |
| Purchase Diary |
| Purchase & Delivery |
| Companies Used |
| SVA Test |
| The Japanese Angle |
| Japanese Market |
| Buying a Car in Japan |
| Japanese Car Auction |
| Galleries |
| Gallery |
| Owner's Gallery |
| My Estima |
| Queries etc. |
| FAQ |
| Can you Help? |
| Owner's Experiences |
| My Estima Review |
| Misc. |
| New Estima |
| Importing to Australia |
| Estima Tow bar |
| Imported Car Show |
|


The following information is available on The Mad Mechanic's site. JJ (aka the Mad Mechanic) has very kindly allowed me to reproduce the information here.
I asked JJ if the codes would be the same for other diesel engined models like the CXR21G (mine), and here's his answer:
"About the codes for your CXR21G, the codes should be similar to that of the 10G. What usually happens with the Toyota OBD is that the meaning of codes remains the same however, the detection method may change from model to model. So for instance, certain faults may be recorded by the ECU at the engine speed below 1500rpm, can be at 2000rpm from the next model or similar. Cars after around 1996, they use something called OBD2, which has the advantage of the whole thing being standardised, but the disadvantage is that you got to have a code scanner."
TOYOTA On Board Diagnostics
Introduction
to On Board Diagnostics
Number of
components of modern motor vehicles are now controlled by computers electronics and this
has lead to significant improvement of the performance and reliability.
However, once things go wrong, it can be a real nightmare. Most symptoms are often
'occasional symptoms', making the diagnosis very difficult. Moreover, certain symptoms can
sometime disappear during the diagnosis process, in which case the cause will be unknown
until it strikes again.
Of course, the use of oscilloscope or special inspection tools may come in handy for this
sort of tasks but at the same time not all mechanics can have access to such equipment or
facility.
Thus the engine management computer, which is often referred to as ECU (Engine Control
Unit) comes with a feature which monitors the system network and when a fault is detected,
it may switch to so-called 'safety mode' to guarantee safety as well as inform the driver
as necessary and records the associated problem areas.
This is the OBD (On Board Diagnostic) system, the self-diagnosis system. The records of
problem areas are stored as codes and this can be recalled by carrying out a particular
procedure where a specific code is displayed by either flashing a warning light in certain
intervals or by providing different voltage from the service socket etc.
This may seem a wonderful system which gives solutions to all problems. NOT! It should be
noted that the OBD is never perfect and time to time, they do lie. The OBD may sometimes
show the 'normal' code despite the fault is still present and visually evident. Also the
OBD cannot detect every single fault on the car either.
Therefore, one should always be prepared that even if the 'normal' code is shown, the
fault may still exist within the area outside the scope of the OBD.
Above all, cars still rely heavily on the mechanics who maintain them and nothing can be
more precious than skills and experience.
Toyota's OBD
system is one of the most user-friendly and no major change has been made since the it was
first introduced.
The design of service connectors may differ from model to model as well as year to year
but the main procedures are mostly identical.
Early service sockets were round shaped and voltage meter had to be connected in order to
obtain the code. The code was obtained by counting the number of times the voltage changes
from 0 volts to 5 volts in given intervals.
However, modern service sockets are mostly square shaped and do not require a voltage
meter. Instead it blinks the 'Check Engine' warning light.
Initially, codes were displayed in 1 digit figure, but as the OBD became capable of
tracking more areas, it was no longer possible to cope with just 1 digit number thus most
modern models display codes in 2 digits figure. Furthermore, some models are equipped with
dual mode detection, which in addition to the ordinary diagnostic function, the system has
a secondary mode which is capable of detecting instantaneous faults.
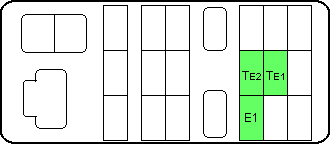
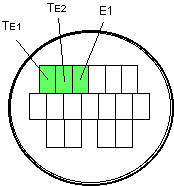
There are
two service connectors. One is located at various locations in the engine compartment
depending on models, while the second one is located inside the car, usually below the
driver's side dashboard and either of them can be used to carry out the test.
| NORMAL MODE Testing 'NORMAL MODE' displays code(s) for the present faults as well as the faults occurred in the past. 1. Turn the ignition key to 'ON' position and make sure the 'Check Engine' warning lights on the dash board comes on. 2. Turn the ignition key to 'OFF' position. 3. Open the cover of the service socket located in the engine compartment. 4. Link the terminal marked TE1 and E1 together with a piece of wire. Note: Terminals are often filled with grease to prevent corrosion and this sometimes creates difficulties seeing each terminal, hence care should be taken to ensure the right terminals are linked. |
  |
5. Turn the ignition key
to "ON' position, but do not start the engine.
6. The 'Check Engine' warning light on the dash board should start to flash. The code can
be obtained by counting the number of flashes.
If the 'Check Engine' warning light does not flash, the vehicle may be fitted with one of
the early OBD systems which require a voltage meter to obtain the code. In such case, '+'
probe of the voltage meter should be connected to terminal marked VF and '-' probe to E1
terminal and count the number of times the voltage moves between 0 to 5 volts.
7. With the number of flashes, it can be determined whether the system uses 1 digit code
display or 2 digits code display.
8. The code differs from model to model but if the system is normal, code no. '1' will
shown where the 'Check Engine' warning light blinks continuously. If there is a fault,
there will be a pause between the blinks. The first set of blinks show the first digit of
the code and second set of blinks after the pause indicates the second digit of the code.
For instance, code '41' will blink 4 times in a row and pause, then it blinks once. If
there was more than one code being stored in the ECU, it displays from the lower number
and goes back to the beginning after displaying all the relevant codes.
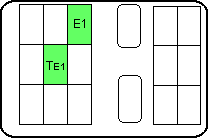
| 1. First of all, it is vital to check everything is fine under 'NORMAL MODE'. If
there is a fault, it should be rectified before proceeding. 2. If the diagnostic codes which were previously stored under 'NORMAL MODE', they must be cancelled. 3. Pull the service socket located inside the car out. This is usually located under the driver's side dash board. 4. With the ignition key in 'OFF' position, link the terminal marked TE2 and E1 together with a piece of wire. 5. Turn the ignition key to 'ON' position and ensure the 'Check Engine' warning light on the dash board flashes. Note: It is important that from this point onwards, the ignition key must never be switched back to 'OFF' position until the test is completed. |
 |
6. Turn the ignition key
and start the engine. During this process, the starter motor signal is been checked. If
the car was started other than using the ignition key, error code showing the 'Starter
signal error' will be displayed.
7. Take the car to a test drive. During the test drive, the speed must exceed 5 km/h
otherwise 'speed sensor' error will be recorded by the system.
8. After the test drive, stop the car but even at this point, the ignition key must never
be switched back to 'OFF' position yet.
9. On the service socket located inside the car, link the terminal marked TE1 and E1
together with a piece of wire.
10. The code will be shown in the manner described in the previous section.
Note: At any time during the process, if the ignition key was accidentally switched
back to 'OFF' position, the test has to be carried out from scratch since the code stored
during 'TEST MODE' will be cancelled automatically whenever the ignition key is switched
to 'OFF' position.
The error codes stored in the ECU by the OBD will remain there until they are cancelled. Whenever a fault is rectified or a routine maintenance has been completed, it is vital to cancel the code.
For most vehicles, removing the EFI fuse for at least 10 seconds will cancel the code stored in the ECU. For certain cars with diesel engines, they may have a fuse named ECD or AM2 instead.
However, there are always few exceptions where codes cannot be cancelled in this manner. If this is the case, there should be a fuse named ECU so this should be removed to cancel the code. Alternatively, disconnecting the battery or ECU connector will undoubtedly cancel the code.
After cancelling the code, run the test again and double check to make sure they are actually cancelled. If they remain, either the cancellation procedures are incomplete or the fault area has not been rectified.
For certain
models, automatic gearbox management system is built-in into the ECU. For these models,
the OBD will also check the automatic gearbox system when the test is carried out.
However, OBD for automatics will flash 'O/D OFF' warning light instead of the 'Check
Engine' warning light.
Hence, if during the test, the 'O/D OFF' warning light starts to flash, it means that the
automatic system is also being checked. The method of obtaining the code is the same as
described earlier and necessary action should be taken according to the result.
The Toyota Estima Range's OBD Codes
| ESTIMA, MAY/1990 on | OBD codes for TCR11W type Estima with natural aspirated 2TZ-FE engine. Model year, May 1990 onwards. |
| ESTIMA, FEB/1993
on Normal Mode / Test Mode |
OBD codes for TCR10W type Estima with natural aspirated 2TZ-FE engine. Model year, February 1993 onwards. Choice of testing in Normal Mode or Test mode. |
| ESTIMA, AUG/1993
on Normal Mode / Test Mode |
OBD codes for TCR10W type Estima with natural aspirated 2TZ-FE engine. Model year, August 1993 onwards. Choice of testing in Normal Mode or Test mode. |
| LUCIDA/EMINA,
JAN/1992 on Normal Mode / Test Mode |
OBD codes for TCR10G type Lucida and Emina with natural aspirated 2TZ-FE engine. Model year, January 1992 onwards. Choice of testing in Normal Mode or Test mode. |
| LUCIDA/EMINA,
AUG/1993 on Normal Mode / Test Mode |
OBD codes for TCR10G type Lucida and Emina with natural aspirated 2TZ-FE engine. Model year, August 1993 onwards. Choice of testing in Normal Mode or Test mode. |
| LUCIDA/EMINA, JAN/1992 on | OBD codes for CXR10G type Lucida and Emina with turbo charged diesel 3C-T engine. Model year, January 1992 onwards. |
| LUCIDA/EMINA, AUG/1993 on | OBD codes for CXR10G type Lucida and Emina with turbo charged diesel 3C-TE engine. Model year, August 1993 onwards. |